Timetable interaction |
|
|
Timetables can be called up manually or set to open automatically (if desired) when an element is selected in a different window The automated function means that you will always have up-to-date information on the screen without having to search for it.
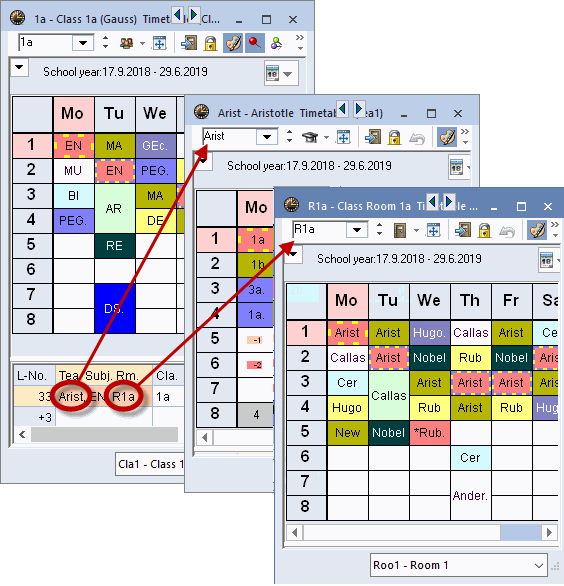
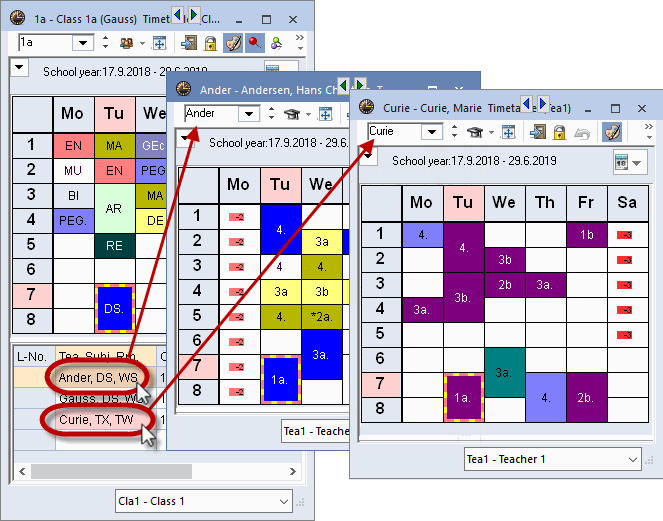
Communication between timetables Open the file demo.gpn and call up a timetable for classes, teachers and rooms, and arrange the timetables next to each other. Click on Monday, period 1 ('E') in the timetable of class 1a. As you can see, the teacher timetable automatically switches to the timetable of the teacher involved in the lesson (i.e. Aristotle, 'Arist') and the room timetable switches to the room allocated to this lesson ('R1a').
Clicking on the coupling row in the period details window also synchronises all other open timetables.
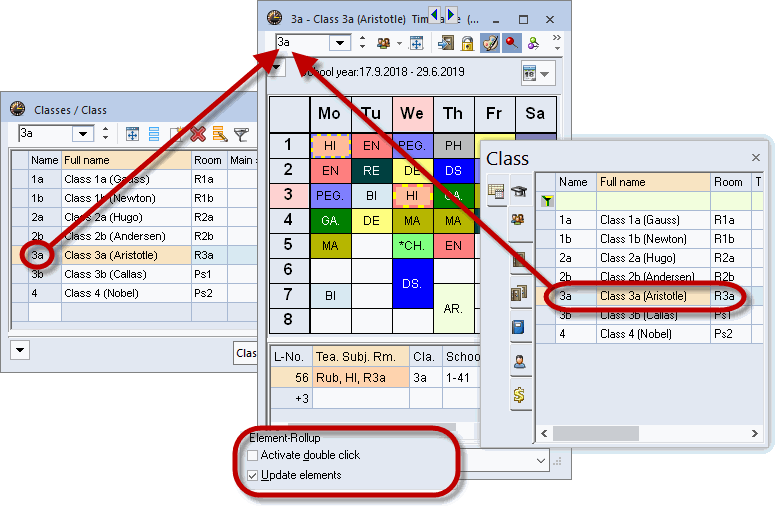
Communication with other windows Open a class timetable and the master data window for classes. Click on a class in the master data window and you will see that the timetable automatically switches to the timetable of that class.
The same occurs when you switch elements in a lesson window or in the element-rollup ('Customise' under 'Settings | Miscellaneous').
Locking timetable types In the previous examples, the type of timetable was always locked. Open the file demo.gpn, a teacher timetable and call up the window 'Teachers | Master Data'. In the master data view, click on one teacher after another. The timetable window always shows the timetable of the currently selected teacher. Clicking on a class name in the window 'Classes | Master Data', however, has no effect on the timetable view, i.e. the type of timetable – here the 'teacher' timetable – remains unchanged.
Unlocked timetables Deactivate the type locking function by clicking on <Lock Type>. Switch between teachers, classes and rooms in the master data views. You will see that the timetable always displays the active element, irrespective of the type of element (classes, teachers, rooms or subjects). The displayed element changes, as does the type of displayed element.
Tip Unlocked timetables are particularly practical when used together with the diagnosis tool, since this allows the user to switch rapidly between teacher and class schedules without having to open a second timetable window. You can read more about diagnosis in chapter 'Diagnosis'.
Locking elements Lock the timetable of a selected element – for instance a specific teacher – on the screen by 'pinning' it to the screen using the <Lock this display> button When a timetable is locked with two pins, the displayed element does not change.
|