User groups |
|
|
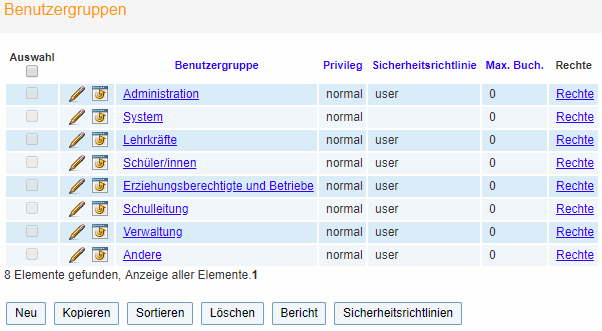
The following user groups are shown when you go to <Administration> | <Rights and roles>:
•Administration •Teachers •Students •Legal guardians and companies •School management •Main office •Public
Note: Standard groups The aforementioned standard groups are more than sufficient for every day school life, but you can create additional groups at any time – see below.
When you go to <Administration> | <Rights and roles> all user groups are listed. This overview also shows how many users per user group have already been defined.
Clicking on the user number on the top right opens up the list of the respective users of this group.
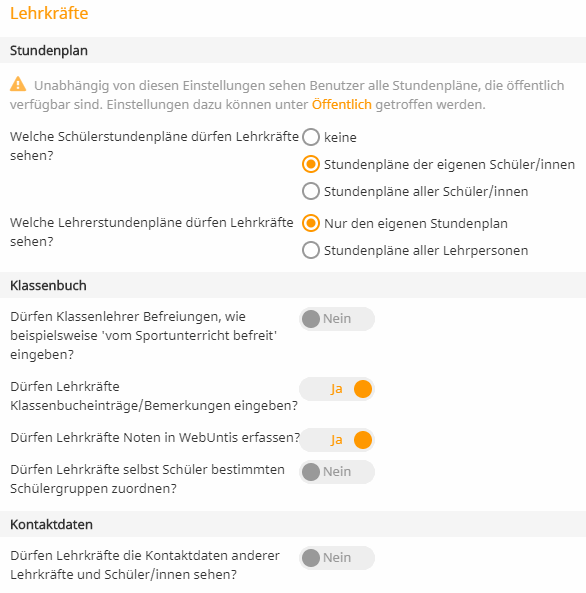
Clicking on the user group opens the most important rights of the respective user group. Example: teachers:
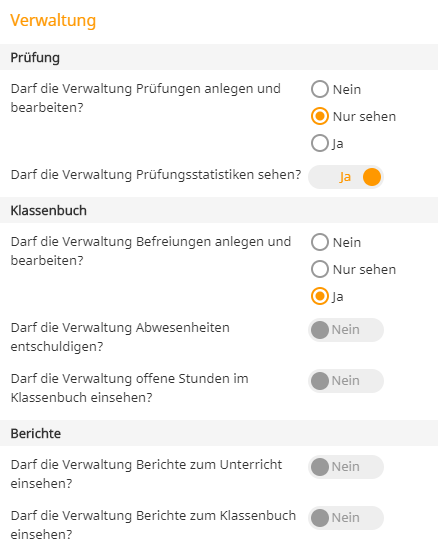
Another example: the user group of the main office:
This section was created for WebUntis 2019 in order to be able to modify the most important rights settings per user group the fastest possible way. This will not be sufficient after some time in practise – this is why we created the expert mode.
Expert mode
Go to <Administration> | <Rights and roles> | and click on the link at the bottom left 'Switch to expert mode'.
Creating user groups
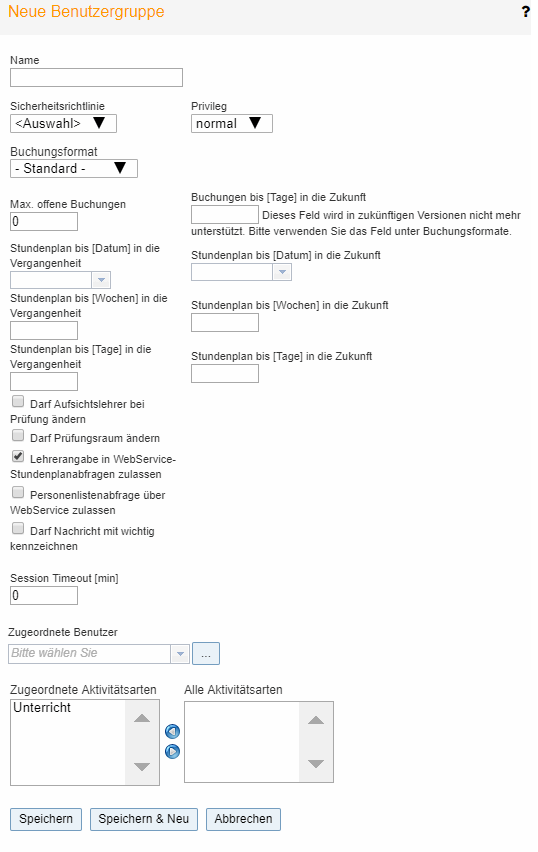
In the expert mode, you can create new user groups. Go to <Administration> | <Rights and roles> | 'Switch to expert mode' and click on 'New'.
You can set the following attributes:
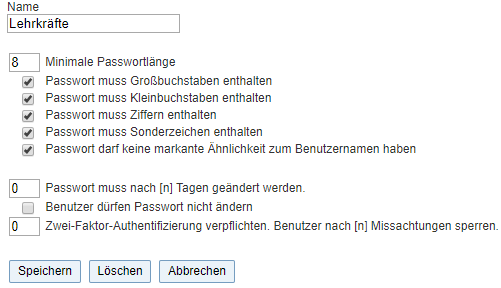
Security policy Here you can choose all security policies per user group, e.g. members of the user group 'Students' should only choose passwords with a minimum length of 7 characters and only with special characters. Or a class user which is jointly used by students, should not be able to change passwords. For saving special security policies go to <Administration> | <Rights and roles> | <Security policy> button.
Privilege Define privileges of the respective user group. Example: The user group “Headmaster” may have a “high” privilege status. At the same time there are, e.g. absence reasons which only users of a “higher” privilege level are allowed to us. Therefore, only users of the user group “Headmaster” can create an absence with the reason “school representative meeting” for students.
Booking format Select a booking format to show single fields differently than in default format when creating a new booking (Agenda module). For defining booking formats, go to <Administration> | <Booking formats>.
Max. number of open bookings (only available in WebUntis Agenda module) In this field you enter the maximum number of open bookings per member of the respective user group. If you do not permit more than e.g. 5 open bookings, it is only possible to book number 6 when number one’s date has passed.
Booking possible until [days] in advance (only available in WebUntis Agenda module) This field avoids that users carry out bookings at any date. If you enter e.g. 30 in this field, bookings are only permitted within the next 30 days (counted from the current date). Please note that this field will no longer be supported in future versions.
Time limits of timetable view You have three different possibilities each to limit the view of timetables for the respective user group for the past and for the future.
Session Timeout [min] This is the defined time elapsing before an inactive user is automatically logged out. The session timeout set in the general settings (<Administration> | <Settings>) is valid for all users, however, here you can define different timeouts for different user groups. The maximum timeout you can define is one hour, i.e. 60.
May change the supervision teacher When you activate this option, members of this user group may change the individual supervision teachers when creating a new exam.
May change the exam room When you activate this option, members of this user group may change the room when creating a new exam.
Allow the specification of teachers in the WebService query When you de-activate this option, it is e.g. possible to hide the teachers’ names in the smartphone app.
May flag messages as ‘important’ Internal messages can be sent with an additional flags.
Report
Go to <Administration> | <Rights and roles> to define that a report is generated on members of individual user groups.
History of user groups For security reasons, you have the possibility to have a look at a user group’s history:
Here you see which rights of which user were activated or deactivated in a user group. |